Wednesday, 23 September 2015

Blankets for the Homeless

A friend of mine coordinates a project to provide blankets to the homeless or those staying in shelters. She recently put out a plea to get more squares knitted or crocheted, these could be in any yarn and just needed to be 6 x 6 inches in size. I was happy to oblige and raided my cupboard for all left overs that I had and began to crochet. I still have not mastered the art of being able to do a decent granny square so stuck to a simple double crochet stitch.  It was satisfying and quite quick to produce a handful for her although I was struggling to get them to be exactly 6 inches. hopefully she will have other odd sizes she can use up at some point.

This has been a great in car project when I am waiting around for the school pick up, much better than my usual routine of endless checking of e-mails and social networks!

Thought this year I would also keep track of how much I do as a bit of internal competition, I am counting at the point at which I pass things to Mrs BFTH. So far I am up to 4 blankets edged and 13 squares. My crochet techniques has improved quite a bit since I started doing this, the squares are so small that you can finish one and then try a new technique out on the next. I have just started to crochet in my starting ends as I go which saves on having to stitch them in later. 

Here is hopefully a link to the Facebook page and the website that is in the process of being built:


Enjoy 😀


Friday, 18 September 2015

Crochet Jumper


See, I knew if I wrote a list of my outstanding projects I may actually finish one and it worked!  Over the last couple of days I have finally finished my first crochet jumper.....and possibly my last :(

If I saw this jumper in a shop I would not give it a second glance, if I actually tried it on I would never buy it as it is so poorly fitting and yet this is what I have ended up with.


I used a pattern from the book "Crochet in no time" by Melody Griffiths, it was taken me a couple of years complete.  The pattern was the Frill-Edged Sweater.  I used SMC Select Brioletto yarn in burgandy which was a blend of Wool (60%) and Polyester (40%). It wasn't quite the same as what the pattern asked for but close enough.

Unfortunately I had really poor tension and was utterly rubbish at following a pattern so the jumper looks nothing like it is meant to, the neck is too big, the jumper too wide and the length not long enough.  All that combined with ridiculously shaped sleeves and the jumper is barely wearable.

I say barely wearable as despite all its faults I have put too much into this jumper not to use it so it will be my slop around the house sweater.

Thursday, 10 September 2015

Quilt number 11 - Triangles

This quilt was for a colleague at work who had just had a baby.  I kept the cutting simple by using triangles, I made 6 1/2 inch squares (conveniently the width of my large ruler) and then cut them diagonally.

The fabric had to be gender neutral as as I didn't know the sex of the baby before it was born and wanted to get a head start on making it, not that is made much difference to the finishing time as it was still only completed a couple of months after the birth!

The printed fabric is from Lewis and Irenes's spring 2015 collection "Safari". I added solids of green and yellow with some makower spraytime which is my go to fabric when I need a plain fabric but want it to be just a little more interesting. It ended up being quite a low density quilt but hopefully that will be mice a soothing for the baby.

I struggled for a little while to get happy with the layout of the pieces as I was making it up as I went along but also had directional fabric.

I also added a strip of patchwork to the back as I had some squares left over. To speed up the quilting I machine quilted it in a meandering free motion style and then used did some in the ditch quilting for the first time round the border using my special foot.


Reverse of the quilt

In the ditch quilting


Tuesday, 4 August 2015

Table mats and table runner

This has been made for a gift for a house we are staying at in the summer in Ibiza.  Ibiza has lots of gifts with lizards on them as they can be found all over the place so I wanted to find some fabric with them one. I finally tracked down this one by Robert Kaufman and so promptly order a couple of metres of it.

I kept the design of the mats simple and could make several at a time just by cutting the dimensions across the widths of the fabrics, then piecing and cutting again.  I needed to be sure that I could get this done in time for the holiday!

Having recently been on a free motion quilting course at Hometown in Rochester I was also keen to try out some of the techniques shown, hence the row of hearts down the strips.


Friday, 26 June 2015

Crochet baby blanket

I had started this blanket when my sister was expecting a child but sadly my crochet skills were not really that great so it was left and occasionally worked on and then got stuffed to the back of the cupboard for several years, during which time the child grew up and at the time I completed it was 6 years old and I had not got enough yarn to make it a larger quilt.


I wanted my first blanket to be a traditional granny square pattern and learnt how to crochet them on a course at hometown. When I came to do it at home I soon became frustrated with continually having to change my yarn so decided that one granny square would be plenty to make an accent square (oh yes, I know that is cheating!)


I decided to use the opportunity to try out squares in several different stitches to add variety to the project and managed one more patterned square by using stripes. The yarn I used was a selection of cotton dk by Debbie Bliss, colour, 13002, 13039,13009, 13038 and crocheted using a 4mm hook.


Once I had completed all the squares I played around with the layout on the floor in a similar way I would do with my quilt blocks before deciding on the final layout. Once decided I took a picture of it on my phone so I didn't need to number the squares and had a quick reference:


 I then crocheted it all together giving a border of a row of double crochet.  I finished it with a scalloped edge which is really quite simple but helps to bring the blanket together.


The finished item was then going to be given to my newest nephew but my son has decided that it would be his cuddle blanket while watching television.


Monday, 11 May 2015

Beach Bag

This project was started out of frustration knowing we are going on holiday in the summer and I rarely have space for anything in my bag by the time I have tried to get in towels and swimmers for all the family so I designed this bag to be larger that the average tote and have a strap that could fit comfortably over my shoulder.


Being a bag I wanted to use fabric that was thicker than normal quilters cotton and had some gorgeous fabric left over from when I made the curtains for our dining room (I ended up loving the fabric so much that we did curtains for the lounge in the same range but different colours). The fabric was from John Lewis but is made by Malabar Fabrics and is from their Chimichanga collection

I added a pocket on the outside which I stitched across part way down so that I wouldn't be stuffing it too full of rubbish and lined the bag using a curtain lining fabric. The straps to the bag are stronger than they look as I used webbed polypropylene strapping inside the lining fabric, see the link below for this:

http://www.amazon.co.uk/gp/product/B00ES15J76?psc=1&redirect=true&ref_=oh_aui_detailpage_o05_s00

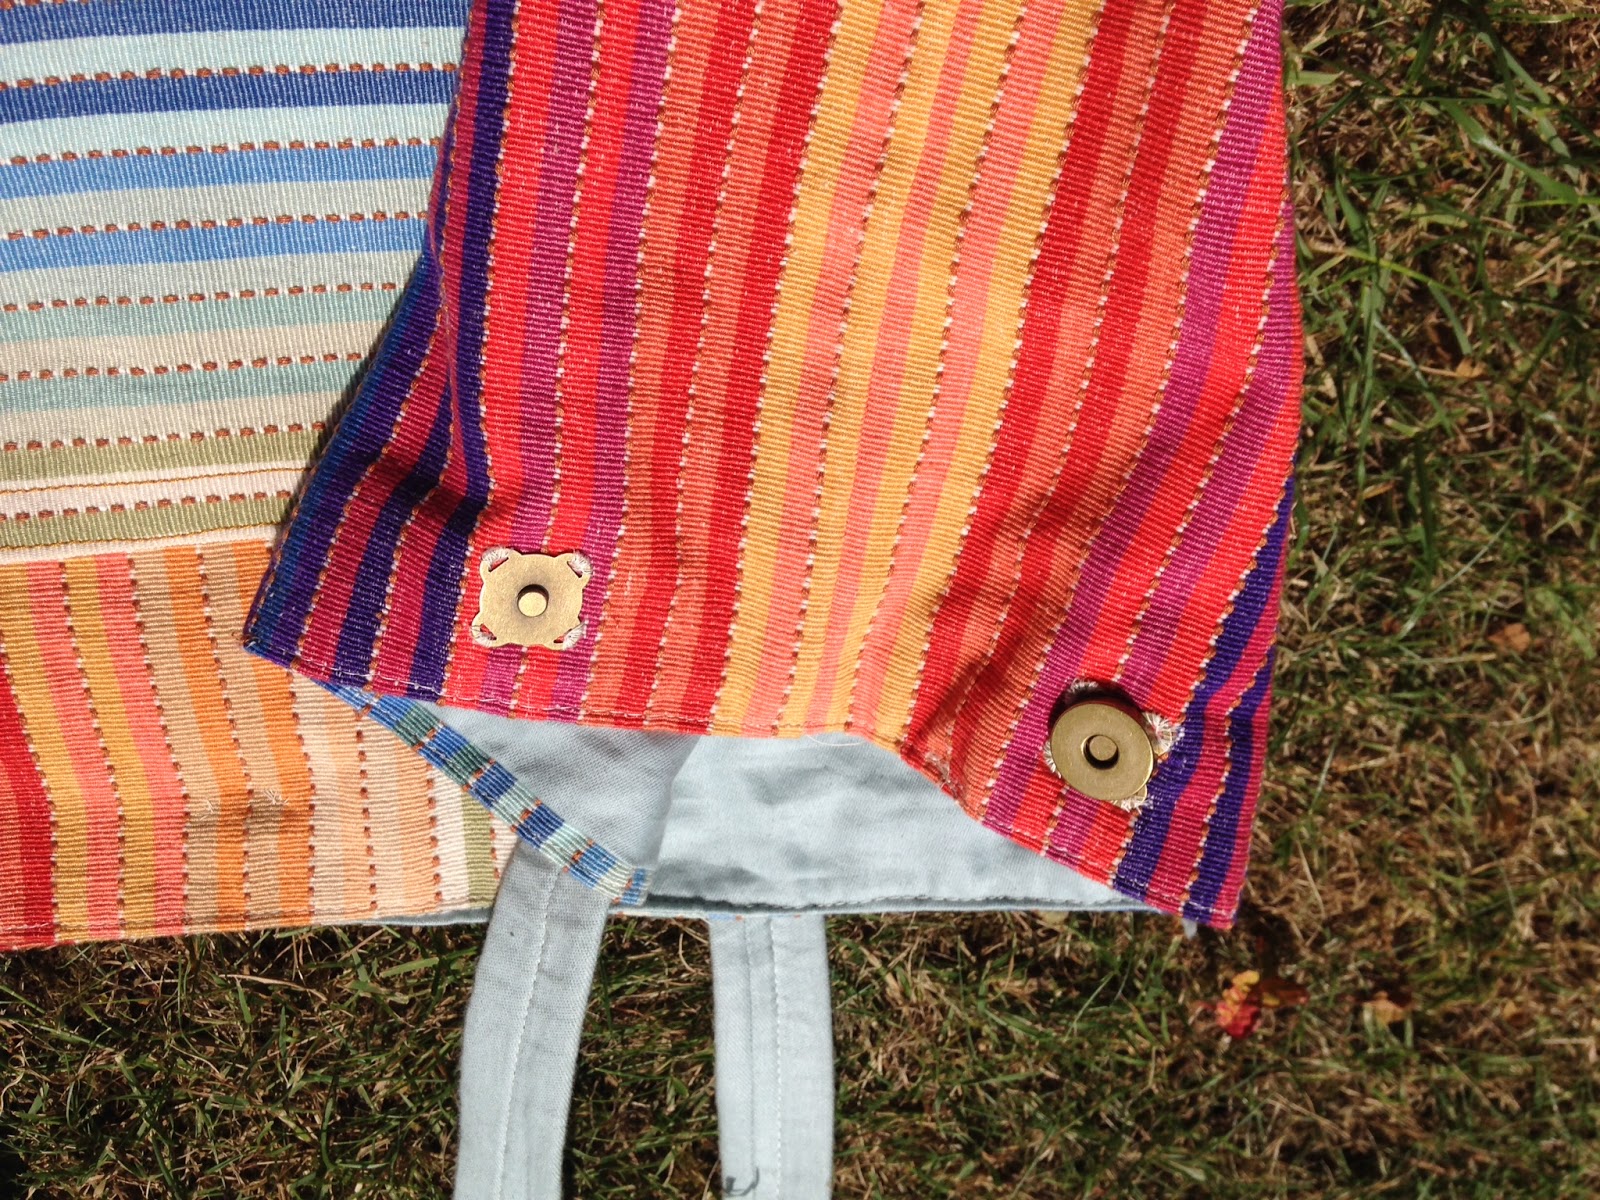
Once I had thought I had finished the bag I found I wasn't particularly pleased with the way it hung so I got some sew in magnetic bag fasteners see the link here to the ones I used:

http://www.amazon.co.uk/gp/product/B00O0WJRR6?psc=1&redirect=true&ref_=oh_aui_detailpage_o00_s00

I added one to each side to bring it in slightly so it didn't gape as much and then one in the middle so it would hold it together.

I am really pleased with the way it turned out, the only slight change I would make would be to use an interfacing on the outer fabric to give it slightly more structure.


Wednesday, 18 March 2015

World Book Day 2015 - Gingerbread man and Peter Pan

This year the school decided that they wanted to stick to a theme of fairy tales for world book day, I was rather hoping my youngest would like the gingerbread man idea but no, he is not big on dressing up but I was glad my daughter loved the suggestion.

Gingerbread man

I attempted to make the rough pattern/sizing by having my daughter lie on a long rolled out piece of paper but drawing round her was tricky and it wasn't that successful, although I did refer to it occasionally for rough measurements when she was in bed.

 Given she had to wear the outfit all day at school  I wanted to make it easy for her to work so parts of the outfit were detachable - the head was attached with velcro and the hands were a basic mitten shape that I made a little long so that they didn't have to join the sleeve.

The fabric was thin fleece which gave some texture to the outfit and didn't fray.  I couldn't believe it when I found some large ric rac in Hometown in Rochester, it was perfect for the embellishments. My daughter wanted the look of it to be similar to the gingerbread man in Shrek so we roughly followed the colours for the face. The facial features were made from felt with the mouth aligned with her eyes for her to see through. I did cover the mouth opening with some pink netting to keep as much of her hidden as possible.

The head also had a large cardboard cut out inside to get it to stay up, I had started by putting boning round the outside but this wasn't sufficient.

There were some last minute messy alterations to the arms so that she could move freely and that was it.  It wasn't the neatest of sewing but it was effective.

Peter Pan

This outfit was so simple to make - but I did ensure I made it before the gingerbread man as I could see myself not getting round to it with all the sewing on the other outfit. The top was a basic t shirt shape, loose fitting with a belt round it to hitch it up, trousers I sort of made the pattern up using another pair of his but I didn't make the seat long enough so they did slip a bit when he sat down.  The hat was trial and error!

The descriptions for both outfits are not great, when I sew for costumes I know that I am never going to be making the same thing again so don't keep track of what I do, in addition I am always running late getting them done so barely stop for photos either!

Monday, 2 March 2015

Children's bum bag, fanny pack or whatever you would like to call it!

This was a weekend sewing project following notification from my son's school that all that children who need certain medicines (inhalers or insulin) should keep it on them at all times and the suggestion was a bum bag.  In order to make it more appealing to wear I took my son to my favourite fabric store, Hometown in Rochester, to allow him to pick out his fabric and with a little guidance to steer away from large prints and light prints he settled on the robots, Makower Fabrics Robots Dark Little Monsters Collection.

The pattern I used was one I found on pinterest from daisyjanie below:

http://daisyjanie.typepad.com/daisyjanie/2011/06/hip-pouch-sew-along-supplies-list.html

The things I would note about this pattern:

1) It does mention using canvas as the lining fabric, I didn't have any so used cotton with interfacing on my lining.


2) It is quite a small bag, I have included a photo with my rotary cutter on it so you can get an idea of size. For me it was nice that it wasn't too big for my son, being only 6 but it only just fitted the medication he needed.


I used some polka dot lining from my stash that my mother-in-law had got from India.


DaisyJanie had included some printable pattern pieces which were very helpful to use.

The pattern gives the option of using either a webbing waist band or making it out of the fabric, I chose to use the fabric made one - hopefully it will withstand the daily use of my son.

Despite my best efforts to get the robots to stand the correct way up on the waist band I lined them up on the backing fabric when attaching them forgetting that I should have really lined them up with the front panel! Sadly I only realised this late in the day when I had lost the will to unpick.

However I did need to unpick parts later as you can see when layering up the pouch to stitch it all together I had forgotten to tuck the straps inside first. Very annoying but I was on a mission to complete it.


Daisy Janie gave thorough instructions with lots of photos, I would be willing to follow another pattern again.

It would be good to see if the pattern could be enlarged easily as I do feel this could be slightly too small for general adult usage.

Anyway, take a look at the finished article below, I hope you like it :)


Monday, 2 February 2015

Drawstring bag - take two!

You may have seen my previous post about a drawstring bag I have made (see here http://jayaquiltsandcrafts.blogspot.co.uk/2014/12/drawstring-bag.html , I liked it so much that I made another as a gift bag for some presents that we were leaving for a lovely little girl whose house we stayed in while on holiday.  The pattern was based on the one from this blog: http://www.incolororder.com/2011/10/lined-drawstring-bag-tutorial.html

I found some great "london" themed fabric, London Buildings fabric by Makower, for the bag that coordinated really well with some fabric I found in my stash. I adapted the pattern that I used before (but also made a slight error in my calculations that I had to rectify as I putting it together. But in the end I was pleased with how it turned out.


This time I made the drawstring out of the fabric too and much preferred it to the ribbons that I had used on the previous one.

Wednesday, 31 December 2014

Quilt number 10 - Rail fence baby quilt

This quilt was done in a bit of a rush...as per normal you could be forgiven for thinking..but I had a lovely new nephew born on boxing day and although I knew he was coming I wouldn't allow myself to start until I had finished off quilt number 9. So I had to pick an easy pattern for quick piecing. I went on the Ipad application Blockfab to find an idea for a simple one and thought I would try the rail fence pattern again, this time without the borders to avoid the mistake I did with quilt number 3.

I am really pleased with the way my fabric stash has built up as I was able to make this quilt from start to finish with only fabrics from my stash, which was handy as I had done enough shopping in the run up to Christmas.  In addition as it was only a cot sized quilt I had some spare wadding left over from a previous project.

I made the strips 2 inches wide and stitched the strips together in 3's before cutting into squares. I followed the simple rule of the safari print in the middle with a pattern on top and a plain on the bottom, apart from one row.


I also added a couple of plain squares so I could personalise it by adding his name in chain stitch (clearly my handwriting and stitching are both appalling as I was frustrated it didn't turn out better).

I tried randomly arranging the squares but in the ended followed a diagonal order to them as it saved any weird matching.

For a change I used the safari pattern fabric which is mini safari by timeless treasures for the backing as well, mainly as I think with hindsight I should have made the strips a bit wider as the pattern was lost somewhat on the front.

I didn't do a small border on this one as I wanted to keep the size smaller so just did the one border. The quilting


was a freehand meander, still not a completely flat back but better than normal. I didn't do it too tight as I wanted the quilt to have some movement as it was only small.

As it is being given to a family with a newborn I did warn them about not using it as a bedcover until their child is 1, quilts are not very breathable.

Sunday, 28 December 2014

Drawstring bag

I made this bag in approximately 2 hours, the pattern I was following was really easy. It was lined and had box corners which I think gave it a smarter finish compared to most drawstring bags. My son picked the car fabric as the bag has been made to keep his inhalers in, it all came from my stash, you will recognise it from quilt number 8 that I made.

The pattern I used was from this blog: http://www.incolororder.com/2011/10/lined-drawstring-bag-tutorial.html the instructions were so clear with no ambiguity at all. I made it to the sizes given but having done it once think it would be easy to resize. I also added interfacing to the outer main fabric just to give it some structure.  I used ribbons for the drawstring but think it would look nicer if I used the  fabric and made some.


Monday, 15 December 2014

Christmas Stocking - Ugandan style

I had the pleasure of visiting my friend in Uganda in October and loved the fabrics that they had. The only issue was that you had to buy them in 3 metre units as this was the standard to make up a dress so I expect I will be making lots of things in the future with the fabrics (of which I bought 4 different types and my friend gave me her left over fabric).  However she did request that I make her a Christmas stocking, which of course I was happy to oblige.  As per normal this project was rushed on account of needing to get it posted to another friend to take out.


I cut out the main fabric first and then applied some fusable webbing to it to make it stiffer. Next was the applique and ribbon detail. I used cookie cutter applique with the african fabric onto a plan fabric that was already in my stash. I also added a small ribbon in order for it to be hung up.

I had to trim the seams to get it to lie flat (even then it was not as neat as some of my other ones)  for the finishing touch I made her initial letter for her out of a different fabric, one that is special as the cushions at a lodge we stayed at were the same.


Monday, 8 December 2014

Quilt number 9 - Quilt as you go

This quilt is the one I made as a replacement to the one I accidentally made with the swazstickers, I was needing to get it done quickly so I kept the pattern simple and used the quilt as you go technique to make the blocks before joining them together.


 I also did a couple of panels of applique to make it more fun and personalise it for the child.


I kept this quilt as a modern style in soft colours, knowing the parents I thought this would be more to their taste than the original colour scheme I went for.

 The main pattern fabrics came from John Lewis, who have recently extended their quiting range at my local store - just watch out for the labeling, the other day I saw some gorgeous elephant print fabric that would have been great on a baby quilt that was hand wash only, seriously - who has time to hand wash baby quilts.

Kept the blocking and binding simple too. I did try for the first time to machine stitch the binding on both sides so I could get it done quicker. Unfortunately this ended up looking a bit messy and I probably shouldn't have tried to so it so fast on my first attempt.


Friday, 21 November 2014

Uncle Sam Trousers

Another outfit for dressing up, this time for the May Fayre at the kids school, they also have a parade up through the village to open it. The theme for my DS was "America", which I was not daunted by in the slightest as DD had also had to have an american dress up theme a few years ago so I could already dig out the t-shirt (yes, I did stick on the 50 stars!) and the crumpled hat that I made from felt. Didn't think he would want to wear a red and white stripey skirt so I rustled up a pair of trousers.


Given my dislike for cutting and piecing patterns I thought it would be easiest to use an existing pair of trousers as the pattern as I knew they fitted. So after a bit of stretching and drawing I had cut out the pieces and then got to use my new toy - MY OVERLOCKER!! This humble piece of equipment is supposed to revolutionise my sewing, or that is how I sold it to my other half when convincing him of the need for one.  I was impressed with the professional finish it gave the clothes and the speed at which it could do alterations - just need to make sure that I don't over adjust as it cuts as it goes so there is no turning back once done.

As with all my dressing up outfits I did make the trousers slightly on the large side in case they were needed again in the future. Overall I was happy with the outfit.


Thursday, 28 August 2014

Quilt Number 8

This quilt has taken rather a long time to complete - it was intended for a friend on the birth of her son but the boy is now 9 months old and she has only just received it.  This quilt was constructed on a cookie cutter applique course at hometown, taught by Marion.  The actual applique side of things was relatively easy, cutting round templates, using wonderbond and then stitching round - but what was really interesting on this course was designing the quilt yourself. I made up the layout myself and the placing of colours and then added the applique to the appropriate squares. The planning of the quilt was quite intense as although you only needed basic maths it did require a lot of concentration to get right, you can see my plans below and the numerous attempts to get it right.

The colours on this quilt are very basic, red, blue and white but sometimes I think it is nice to keep it simple and I didn't want to make another green colour quilt. There was also very little in the way of patterned fabric, I didn't want to draw too much attention away from the applique.

During the construction I used quilters tape for the first time to set out my design on the wall and was really impressed with how it helped with the visualisation of the colours and did lead to a couple of changes to balance out the quilt.

I loved how the front of the quilt turned out, I used free motion quilting all over the quilt which worked quickly but it wasn't without its problems - I managed to get a huge pucker part way down the back but had quilted so much before I realised that it would have ruined it to unpick it. Also the tension went strange when I changed the bobbin.  But the reality is that the more quilts I make the more I realise that I will never make the perfect one as my standards get raised each time.

I will add more photos when I find where I have saved the ones of the wip, so expect this post to change in the nearish future.